AIMS SIBRO Documentation

1.Big Picture of SIBRO
Sibro is a simple-to-use, end-to-end, insurance broking software that helps you to record your prospects, follow-up clients, draft RFQs/quote slips, prepare quote comparisons, record policies and received payments, and eventually deliver policies and endorsements to the clients.
Being a complete insurance CRM, Sibro also offers exclusive features such as auto-reconciliation, recording lost businesses for future evaluations, adding custom fields, etc.
When it comes to claims management, Sibro assists you in handling the entire process from claim initiation to claim settlement. With the help of Sibro, you can record claim intimations, create documents received checklist, send those received documents to the claim processor and do periodic follow-ups until it gets settled or repudiated.
Why use Sibro?
Sibro offers a variety of proactive features exclusively for insurance brokers for a minimal cost compared to the other alternatives available in the market right now. Let’s checkout why choosing Sibro is the best purchase decision that you are about to make.
- Sibro offers high end customization options
You can create your own customized data entry fields, drops downs, etc as per your own requirements. It is also possible to change the display colors per your company’s color theme. Sibro’s translation feature is another highlight where you can translate any data entry fields in your own language which definitely offers you an enhanced user experience. - Easy to use software.
The simple and easy-to-use interface offered by Sibro helps you navigate through its features and functionalities so easily. All features and functionalities are placed so elegantly to increase user experience and reflect an easy-to-learn look and feel.
Still if you find any difficulty in familiarizing with any of Sibro’s feature, write us at support@sibro.xyz. Our support team will be happy to help you.
How do you get started with Sibro?
Our support team will guide you through the “Getting Started” process and ease your on-boarding process to familiarize with the Sibro features. The process is as follows:-
You will get a call from any of our support team representatives to discuss with your requirements.
If you seems interested, we will provide you a product demo that explains the overall features of Sibro Insurance Broking Software. From this you will definitely get the big picture of what exactly Sibro offers and how it will fit in with your business requirements. If 80% of your requirements are met, we will proceed with the UAT (User Acceptance Testing) and fix the necessary gaps. If 100% is met, we can proceed to subscription or purchase.
What are the steps in Sibro training process?
We are sure that Sibro’s feature will excite every insurance brokers and you will definitely move forward with the purchase decision. The next step is the training process. Our product experts will provide you a detailed training about the features and functionalities. The steps are as follows:
Step 0: Big picture Demo of Sibro software
Step 1: Essential Admin – Setting Up Admin (Duration: 60 mins)
Step 2: Prospect Management (Duration: 60 mins)
Step 3: Policy booking (Duration: 60 mins)
Step 4: Custom Fields (Duration: 60 mins)
Step 5: Pay in Rules (Duration: 60 mins)
Step 6: Reports(Duration: 60 mins)
Step 7: Endorsements(Duration: 60 mins)
Step 8: Installments(Life) (Duration: 60 mins)
Step 9: Installments(General) (Duration: 60 mins)
Step 10: Payout Calculation (Duration: 60 mins)
Step 11: Payout Posting and Reconciliation (Duration: 60 mins)
Step 12: Emailing (Duration: 60 mins)
Step 13: Claims (Duration: 60 mins)
Step 14: RFQ and Quote Comparison (Duration: 60 mins)
Step 15: Declaration (Duration: 60 mins)
| Modules | Retail(Direct) | Retail(Consolidation) | Cooperate(Group) | Cooperate(Industries) |
| Big picture Demo | √ | √ | √ | √ |
| Essential Admin | √ | √ | √ | √ |
| Prospect Management | √ | √ | √ | |
| Policy booking | √ | √ | √ | √ |
| Custom Fields | √ | √ | √ | √ |
| Pay in Rules | √ | √ | ||
| Reports | √ | √ | √ | √ |
| Endorsements | √ | √ | ||
| Installments(Life) | √ | |||
| Installments(General) | √ | |||
| Accounts Invoicing and Reconciliation | √ | √ | √ | √ |
| Payout Calculation | √ | |||
| Payout Posting and Reconciliation | √ | |||
| :Emailing | √ | √ | √ | √ |
| Claims | √ | √ | √ | |
| RFQ and Quote Comparison | √ | √ | ||
| Declaration | √ |
After the training you will be well versed with the Sibro features and will have a clear picture of what you are about to experience with Sibro.
Now we will move to either subscription or complete software purchase. In subscription, we have monthly, quarterly, half yearly and yearly subscription options available.
Let’s walk you through the Sibro’s features in detail.
2.Sibro Admin Set Up
This section is exclusively for administrators. If you are not an admin, click here.
How do I know if I am an admin user or not?
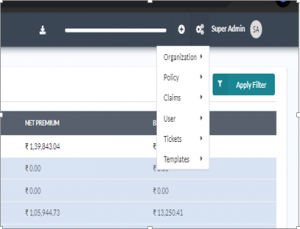
Click on the Settings icon (a gear like symbol) on the top right corner. If you have the admin rights, you will see the menus such as:
- Organization
- Policy
- Claims
- User
- Templates
- Automation
See below screenshot. That’s how it looks!
2.1.Organization
When you click on the Organization menu, you can see four sub menus such as:
- Organization Master
- Branch Master
- Tax Master
- Integrations
2.1.1.Organization Master
Here you can enter/edit your organizational details such as organization name, organization logo, your default currency, the financial year that your business follows, your standard time zone, your country code etc.
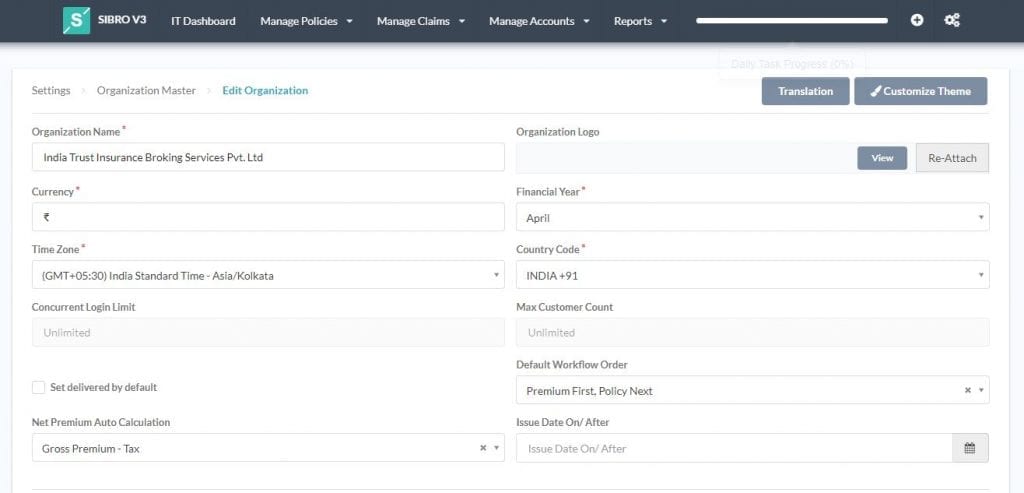
Why should i provide my currency details?
The software will record all the payment details in the currency type that you enter here. You can either add your currency symbol or type in your currency name.
Why should i provide my time zone?
By setting the exact time zone, you will receive your daily summary at the end of the day.
Why should i provide my business financial year?
This will help the system to calculate business statements on a periodic basis.
Why should i provide my country code?
Selecting your country code is a must so that you can share the information via WhatsApp directly from the software easily.
How language translation works in Sibro?
Translation helps you to set up varied language options for better readability and language transparency.
Step 1: Click on Settings → Organization → Organization Master → Translation.
![]()
Step 2: Here you can change your language variants in Client, Policies, Claims, Accounts and Reports.
![]()
Step 3: Click on Save button to update new language variants.
How you can customize Sibro theme?
Customization helps you to personalize your Sibro theme display.
Step 1: Click on Settings → Organization → Organization Master → Customize Theme.
![]()
Step 2: Here you can change the theme colors of App Base, Nav Bar, Buttons, Tables etc.
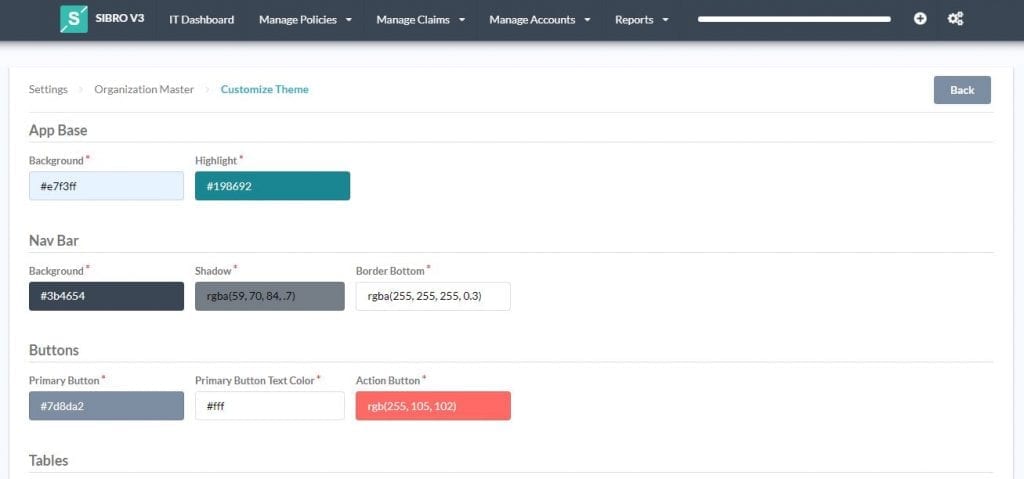
See some of the different color changes oped by our prospective clients.
Step 3: Click on Save button to update the new theme colors. If you want to change the theme color back to the default design, click Reset to Default button.
2.1.2.Branch Master
This feature helps you to add your organization’s branches to the system. Sibro supports multiple branches. By default, the system will only display one head office branch but you will have the option to add multiple branches here (if applicable).
Note: Sibro insists all employees to be part of a branch. All policies booked by the employees of a particular branch are treated as the business of that employee’s branch.
How to add a new branch?
Step 1: Click on the Settings → Organization → Branch Master → Add Branch.
Step 2: When clicked, a pop up will be displayed where you can enter the branch details such as Branch Name, Branch Code, etc.
Step 3: After entering the necessary information, click Add Branch button to complete the process.
How can i edit my existing branch details?
Step 1: Click on the Settings → Organization → Branch Master. You can see all your organization’s branches listed here.
Step 2: Click on the branch that you want to edit. It will expand and all corresponding details will be displayed. Sibro’s click and expand feature will help you to easily perform any edits here.
Step 3: Review the data and do the necessary edits.
Step 4: After completing the necessary edits, click Update Branch button. All updated will be saved into the system.
2.1.3.Tax Master
Tax Master helps you to set up your desired tax names and its corresponding rates. The process is quite simple.
How to set your tax options?
Step 1: Click on Settings → Organization →TAX Master. Here you can see the existing tax types listed here.
Step 2: Click on the tax name that you want to modify. Then you can edit the corresponding tax name and its default percentage.
You can simply change the GST to VAT or Service Tax and TDS to With Holding Tax if required. The corresponding rates can also be changed as per your country’s regulation.
Note: For countries with more complicated tax structures, country specific tax rules will be additionally available.
For example, when the country is set as India, instead of the simple tax master, the more advanced India specific tax master will be loaded – which can also be renamed, updated, etc.
2.1.4.Integrations
This is the place where we connects your emails with Sibro. Also, there is an advanced option where Sibro extends its users the ability to integrate the software with the insurance companies, TPAs, claims, call center applications etc. that you are dealing with.
Here you will see the list of integrated accounts that is linked to Sibro (if any). More details will be explained in the respective below sections.
2.2.Policies
When you click on the Policy menu, you can see sub menus such as:
- Client Master
- Insurer Master
- Insurer Branch Master
- Mode of Payment
- Premium Bifurcation
- Policy Master
- Commission Master
- Reason For Loss Master
2.2.1.Client Master
Here you can see the list of all your clients with their client id, client name, contact information and status(whether Active or Inactive). On clicking any of the names, the table will expand its display to show their details such as address, ID number, login username and password, contact information etc.
You can edit any of the details if needed. Click Update Client button to save any edits done.
You will also have the following provision:
- Merge your duplicate clients
- Add custom fields
- Add new clients
How to merge clients?
You don’t have to worry if you have created duplicate clients in the system. Sibro offers the provision to merge them together via the Merge Clients option. To merge clients, follow the below steps.
Step 1: Click on Settings → Policy → Client Master→ Merge Clients.

Step 2: Here you can select the primary and its duplicate clients.
Step 3: Click on the Merge button and all the details from the duplicate client(s) such as their related transactions, policies, endorsements, claims etc will be merged to the primary client.
How to add a new client custom field?
If you want to capture additional information about the client, you can simply do that by creating an additional text box or drop down via client custom fields. By default, a client will be having the following inputs:-
- Name & Address
- Contact Person Information
To add custom fields, follow the below steps.
Step 1: Click on Settings → Policy → Client Master → Custom Fields → Add Custom Fields.
Step 2: A pop up will be displayed where you have to enter the position number, field name, field type and also need to set whether this field needs to be mandatory or not.
Step 3: Click Add button after entering all the above details and a new custom field will be created. These newly added custom fields will be available during the new prospective business addition.
Note: Adding custom field options are also available with Policies and Claims.
How to add a new client?
Step 1: Click on Settings → Policy → Client Master→ Add Client. A pop up will be displayed where you can add the respective client details.
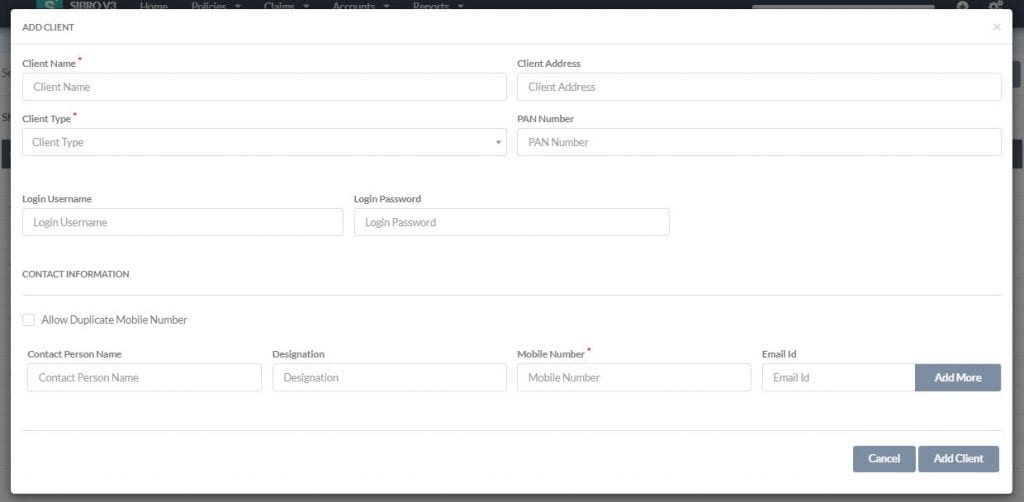
Step 2: After cross checking all the entered client details, click Add Client button to save the details.
2.2.2.Insurer Master
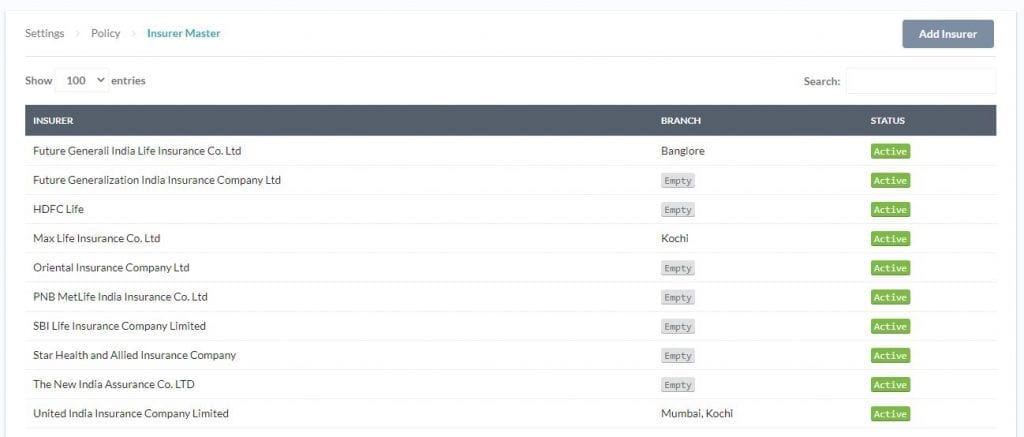
Here you will have the provision to add your insurers into the system. You can add all the respective companies that you are tied up with. All added companies will be listed here.
How to add a new insurer?
Step 1: Click on Settings → Policy → Insurer Master → Add Insurer.
Step 2: A pop up will be displayed where you can add new insurers respectively.
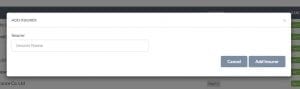
Step 3: After entering the data, click Add Insurer button to complete the process.
2.2.3.Insurer Branch Master
Here you can add the branches of all the insurance companies associated with your organization. All branches will be listed here.
How to add a new insurer branch?
Step 1: Click on Settings → Policy → Insurer Branch Master → Add Insurer Branch.
Step 2: Select the insurer name from the drop down and enter the corresponding details..
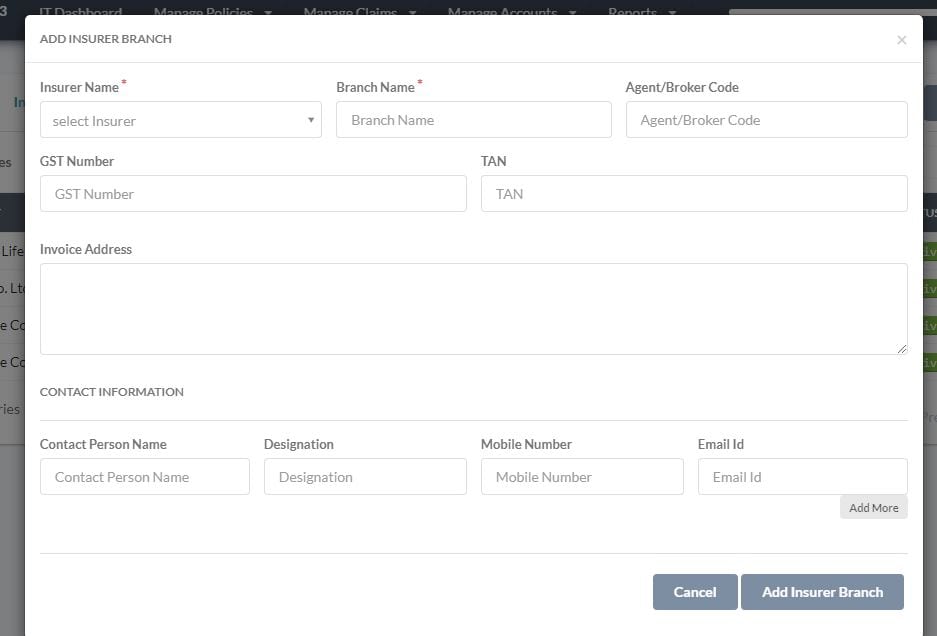
Step 3: Click Add Insurer Branch to save new branch details.
2.2.4.Mode of Payment
Booked In Master is exclusively for insurance agents and sub brokers. They will have the option to manage their multiple business points into one single system via Booked in Master feature.
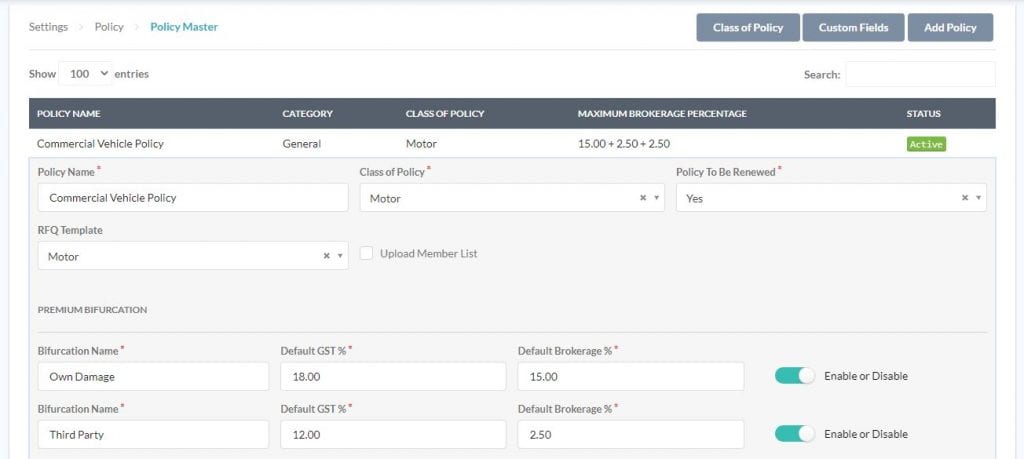
2.2.5.Policy Master
Here you can add all your policy types that your organization is dealing with. The added policies will be listed with their policy name, category, class of policy, maximum brokerage percentage and its status (whether Active or Inactive).
On clicking any of the names, the table will expand its display and show the corresponding policy details. You can edit any of the details if needed. Click Update Policy button to save any edits done.
You will also have the following provision to add:
- Class of policy
- Custom fields
- Add Policy
How to add a new class of policy?
You can create a new policy class as follows.
Step 1: Click on Settings → Policy → Policy Master→ Class of Policy. You can see all those existing policy classes listed here.
Step 2: Click on the Add Class of Policy on the top corner.
Step 3: A pop up will be displayed where you can class of policy name, select category and claims template.
Step 4: Click Submit to save new policy class.
How to add a new policy custom field?
If you want to capture additional information for a policy, you can simply do that by creating an additional text box or drop down via policy custom fields. To add custom fields, follow the below steps.
Step 1: Click on Settings → Policy → Policy Master → Custom Fields → Add Custom Fields.
Step 2: A pop up will be displayed where you have to enter the position number, field name, field type and also need to set whether this field needs to be mandatory or not.
Step 3: Click Add button after entering all the above details and a new custom field will be created.
2.2.6.Pay in Master
Rewards are certain monetary benefits the brokers enjoys apart from the brokerage commission. These rewards corresponding to the insurers are recorded here.
All your insurers with their corresponding branches will be automatically listed here. When you click and expand, you can see the policies with their class of policy, default rewards (monthly) percentage and default rewards (quarterly) percentage. You can do the necessary edits if needed. After completing the edits, click Update to save those changes.
2.2.7.Reason For Loss Master
If you lose a prospect, you will have the provision to mark that prospect/renewal as lost along with the reason. So, if you’re wondering, “Why did you lose that business? The reason will be clearly listed here. Sibro offers the ability to filter and create reports based on individual reasons.
How to add reasons for business loss?
Step 1: Click on Settings → Policy → Reason for Loss Master → Add Reason.
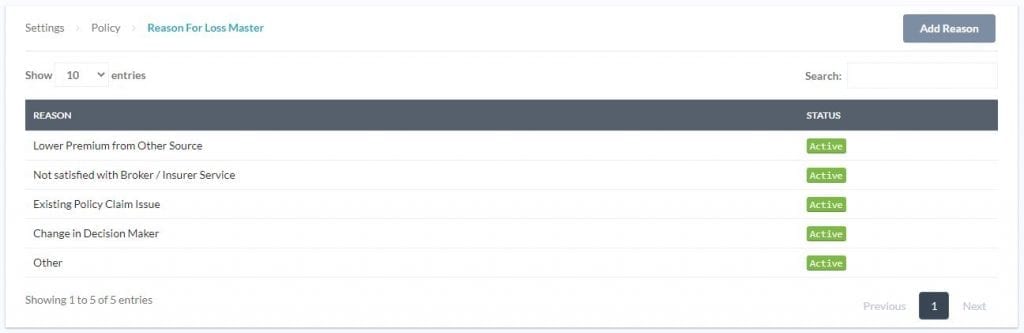
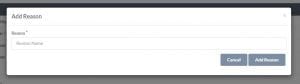
Step 2: Now enter the reason for business loss.
Step 3: Click Add Reason to save changes.
2.2.8.Bulk Update
2.3.Users
Here you can manage your organization’s employees, their destinations and also the team involved. When you click on Employee menu from the Settings, you can see the following sub menus:
- Designation Master
- Employee Master
- Team Master
2.3.1.Designation Master
Here you can define your different designation titles that your organization possess.
How to add a new designation?
Step 1: Click on Settings → Employee → Designation Master → Add Designation.
Step 2: A pop up will be displayed where you can enter the designation name.
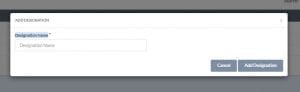
Step 3: Click Add Designation to save changes.
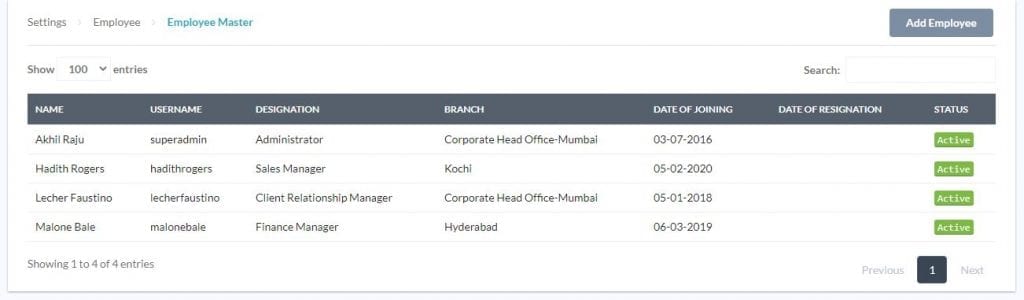
2.3.2.Employees
Here you can add all your employees to the system with their respective names, user name, designation, branch and date of joining.uses.
How can i add an employee to Sibro?
Step 1: Click on Settings → Employee → Employee Master → Add Employee. A pop up will be displayed where you can enter the employee details.
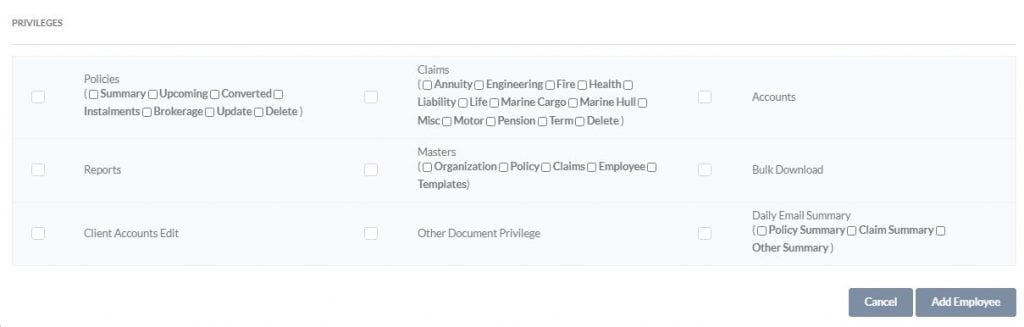
Step 2: While adding a new employee, apart from the basic employee details, admin will have the provision to set privileges for the employee by checking/tick marking the different provisions listed. The email added here will be used as the employee’s default communication email.
Step 3: Click Add Employee to save changes.
How can i edit an employee details in Sibro?
Step 1: Click on Settings → Employee → Employee Master. You can see all the employees listed here.
Step 2: Click on any of the employee names that you need to edit. The click and expand functionality will will display all the details of that employee.
Step 3: Click Update Employee to save changes.
Employee Master mainly consists of three parts such as employee official details, employee business owner details and employee privileges.
How can an admin change his/her employee login credentials?
Step 1: Click on Settings → Employee → Employee Master. You can see all the employees listed here.
Step 2: Click on the employee name that you need to edit his/her login credentials. The click and expand functionality will will display all the details of that employee.
Step 3: Update the username and password in the corresponding fields.
Step 4: Click Update Employee to save new login credentials.
How can an admin block his/her employee Sibro account?
Step 1: Click on Settings → Employee → Employee Master. You can see all the employees listed here.
Step 2: Click on the employee name that you need to edit his/her login credentials. The click and expand functionality will will display all the details of that employee.
Step 3: Add the date of his/her employee’s last day at work or so. This can be done in the Date of Resignation field.
Step 4: Now click Update Employee to save new login credentials.
The next day onwards to the date of resignation, that employee won’t be able to login to his/her account.
What all are the user privileges?
Everything you see throughout the software is user privilege controlled. There are five types of user privileges with Sibro.
All in Company: For the head of the company and for those who have the privilege to see the entire company data.
All in Branch: For branch heads, who should see only his/her branch data.
Select Branches: For regional heads who should see some particular branch data but not everything.
Select Business Owners in Company: Best suited for team leaders, who should see the business of some selected users in the company only.
Self: For users who should see only their business.
If you have the privilege to see full company data, you will see all the company figures and data. If you have privilege to see your branch or team only, you will see your branch or team numbers only. If you have the privilege to see your own data only, you will see only your individual business figures and data.
Also you can set privileges in the following sections by checking/unchecking the subsections.
In Policies section, you can set privileges for Summary, Upcoming, Converted, Installments, Brokerage, Update etc. Delete claims can be assigned from here.
In Claims section, you can set privileges for various class of policies like Annuity, Engineering, Fire, Health, Liability, Life, Marine Cargo, Marine Hull, Misc, Motor, Pension, Term etc. Delete claims can be assigned from here.
You can also set privileges for Accounts, Reports, Masters, Bulk Download, Client Accounts Edit, Other Document Privilege, Daily Email Summary etc.
.
2.3.3.POS
2.3.4.Team Master
Here you can add your internal teams to the system with their corresponding name, branch name, members, sub-team etc.
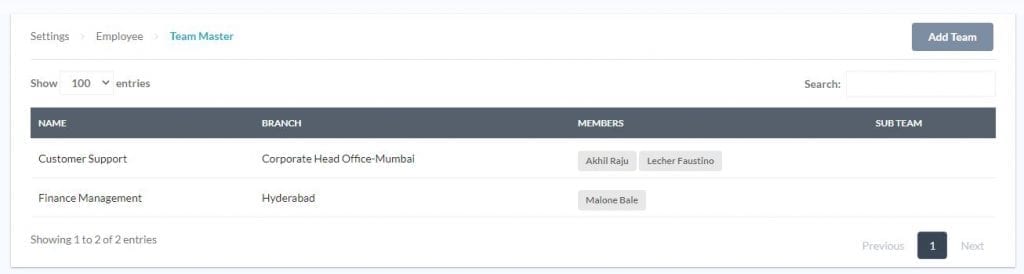
How can i add a team into Sibro?
Step 1: Click on Settings → Employee→ Team Master → Add Team.
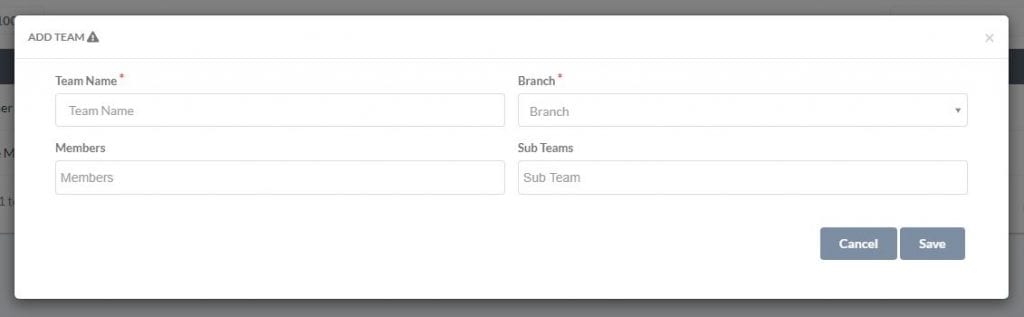
Step 2: Enter Team Name, select branch, members and sub-teams accordingly.
Step 3: Click Save to update changes.
3.Prospect Management
3.1.Add a prospect
Once you add a new prospect business to Sibro, you need not have to worry about remembering the future business. Sibro will remind you on the exact predefined reminder date and won’t let you miss the business.
With prospects, you can create and track follow ups. You will also have the provision to create and send RFQs, prepare quote comparison sheets and a lot more, all from a single platform – Sibro. That’s how you make sure all your business engagements are managed in an organized and systematic manner. Thus everybody in your team will be able to track the same.
Once you win the business, you can convert this prospect into a policy by a single click. That time, you do not have to fill all the details again, because Sibro will automatically fetch most of the details we have already added in the prospect.
3.2.How to add new business prospects?
Adding new prospects can be in two ways.
- When an entirely new customer buys a new policy
- When an existing customer buys a new policy
How to add a new prospect if the client is entirely new?
Step 1: Click on Add (+) → Prospect → Add New Client. A new page named Add Prospective Business will be displayed with two sections such as Client Details and Business Details.
Step 2: Enter all the necessary client information in the Client Details section. This includes your name, address, GST Number, PAN Number, contact details etc.
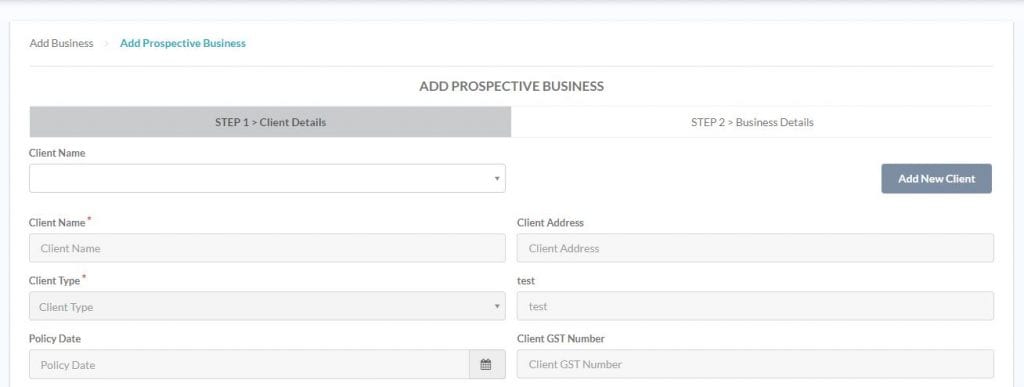
Step 3: Click Next to continue.When you click on Next button, the system will automatically save this client. Now you can see the Business Details section. This includes the business owner, percentage of ownership, insured name, insured address, type of business, premium size etc.

Step 4: Click Add More if you want to add multiple policies to one client.
Step 5: Click Save to add this new prospect into the Sibro. Now you can see the newly created prospect under the Upcoming section under Policies menu.
How to add an existing client as a new prospect?
Step 1: Click on Add (+) → Prospect. A new page named Add Prospective Business will be displayed with two sections such as Client Details and Business Details.
Step 2: Select your client name from the drop down. All corresponding client details will be filled automatically in the respective fields. You can cross check all the details edit those details if needed by clicking the Edit option
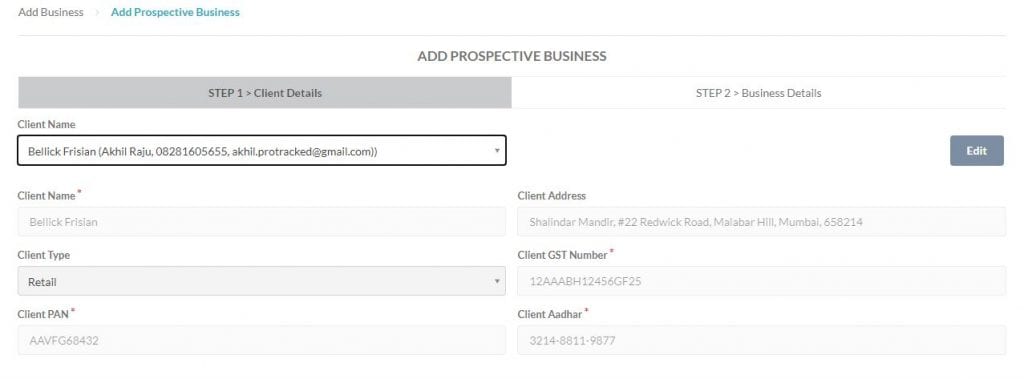
Step 3: Click Next to proceed. Now you can see the Business Details section. Enter the policy name and related details here.
Step 4: Click Add More if you want to add multiple policies to one client.
Step 5: Click Save to add this new prospect into the Sibro. Now you can see the newly created prospect under the Upcoming section under Policies menu.
3.3.Upcoming Policies
The Upcoming section gives you the list of all the upcoming prospects and renewal businesses. The upcoming section is categorized into a set of convenient tabs such as All, Due Today, Due Tomorrow, Due This Week, Overdue, Followups and Calendar. You can drill down further via Apply Filter and Search options .
There are basically three types of business listed in the upcoming section.
- New Business
- Renew Business
- Rollover Business
Renew or own renewals are auto-generated from the previous policy. Rollover (i.e. market renewals) and New (i.e. prospects) should be manually added or imported via Add Business.
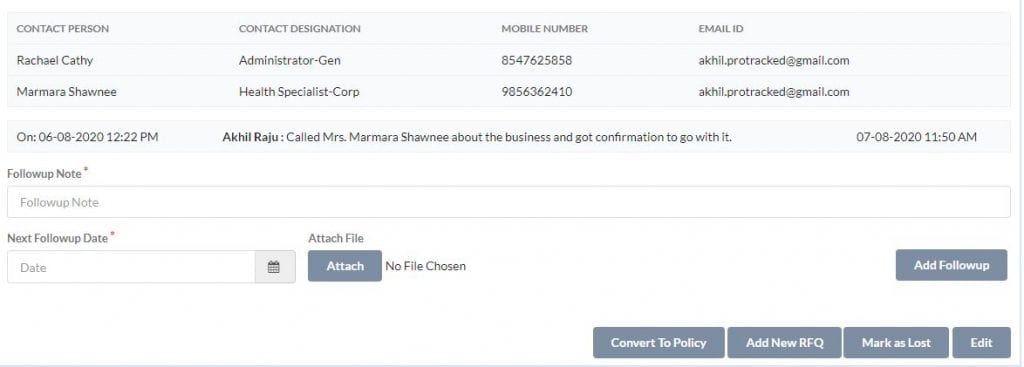
A tabular display with all the upcoming policies will be listed here. Each row in the table represents a prospect. Click on any of the prospect (row) and it will expand and give you more details. You can add a follow-up note, create a RFQ /Quote slip and email them to insurers, prepare quote comparison sheets etc.
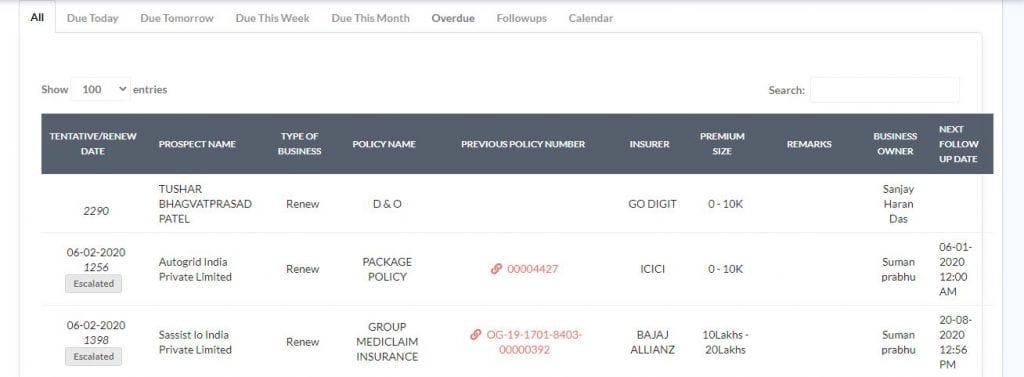
Also you will have the option to mark the prospect business as lost, if you are not able to grab the business for that particular engagement else convert the prospect into a policy by clicking on the Convert to Policy button.
3.4.CRM feature
3.5.Follow Ups & Reminders
Sibro will remind you about all the pending business with a variety of views like All, Due Today, Due Tomorrow, Due this Week, Overdue, etc. You can filter further by clicking on the Apply Filter on the top right. You can also search for a prospect via the search box on the top right.
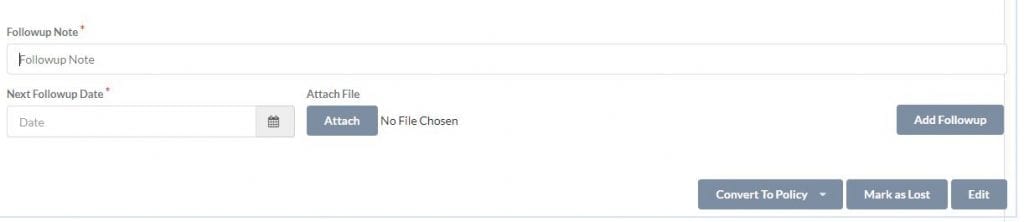
Once you make a follow up with the client — be it meeting, or call, or email — they can be recorded in the system as a follow-up note. So, you will have a history of what has happened with the prospect. You can also set next follow-up date here and the system will remind you to follow up that client on that date time.
3.6.Mark Prospect as Lost
You may not always win a prospect business. It could be because of any reason. When you loss a prospect, you can mark that prospect as lost by clicking Mark as Lost.
How i can mark a prospect as Mark as Lost?
Step 1: Click on Policies → Upcoming → Prospect (Click & Expand) → Mark as Lost. You will be asked for stating a reason for loss.
Step 2: A pop up will be displayed asking for stating the reason from the drop down (so later you can analyse the loses by reason in Lost Business Report.).
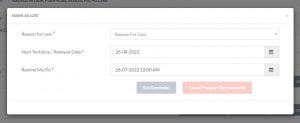
Step 3: If you want a reminder next year, set the next tentative date and reminder date time and click on Set Reminder.
Step 4: If you do not want a reminder, click on Close Prospect Permanently button.
4.Policy Booking
There are mainly three sections under Policies: Upcoming, Converted and Installments.
The upcoming section deals with your upcoming prospects and renewals. The converted policies section deals with the tracking of your booked policies. All installments will be listed in the Installments section with their respective client name, insured name etc. In this case, the premium will be paid in installments such as monthly quarterly, half yearly etc.
Here also you will have the option to filter data using the Apply Filter option.
4.1.Convert prospect to policy
Once you win a prospect business, that is, when you receive the premium amount from the client for a prospect, you can convert the prospect to customer.
4.1.4.Renewal
4.2.Converted Policies
The Converted Policies section lists all the policies that you have converted. From here, you can track every booked policy of our business. You can filter by current stage, age, make updates, and get more details about each policy.
4.2.1.Add premium transaction
Whenever we receive a premium or have to make a refund, we record it in Sibro via Add Premium Transaction.
What are the steps in recording a policy after receiving the premium amount from the client?
Step 1: Click on Policies → Upcoming → Prospect (Click & Expand) → Convert to Policy. You will be navigated to the Add Premium Transactions page.
Step 2: All corresponding data will be auto filled. You can crosscheck the premium transaction details, fill in if any field requires data like amount received from client, mode of transaction etc. If the transaction is a payment, you will be asked for Payment Type. It can be Policy Premium or Additional Premium. If the premium is for one or more policies, then select Policy Premium here. System will ask for the policy for which the premium is being paid for. You will also have the provision to attach the final proposal document here.After entering so called details, cross verifying the existing data, click Save.
Note: Some fields will be set as disabled in this page as they are not open for edits. Eg: Transaction type and payment types.
Step 3: Now the system will display a pop up ask whether you have the policy document in hand or not? Click Yes or No accordingly. Chances are you may not have the policy document in hand at that time. So click No and continue.
Step 4: Once done, the prospect will be moved to the Converted section with status Policy Awaited. Now the system will wait for the policy document to arrive.
How Sibro manages single premium for multiple prospects?
If the client pays a single cheque for multiple policies, at the time of adding policy premium, you will be asked to select the prospect to be converted. You can select multiple here. If the prospect is not entered, click on Add More and enter the details of the prospects for which the payment is made.
Sibro will there after wait for those policies to arrive.
4.2.2.Add Policy
Once we record the premium, Sibro will wait for the policy documents to arrive. Sometimes, you will get the policy document instantly sometimes it may take days.
When you receive the policy document, you need to add the policy details to the system.
How can i add policy details to Sibro?
Step 1: Click on Add (+) → Add Business → Policy. Here you can see the policy listed in the Converted page where Document is awaited.
Step 2: Find the respective policy by using Apply Filter or Search option and click on the Policy Awaited button. The system will display a form where you can enter the policy details. Note that most of the information is automatically filled by the system also also calculates most of the premium figures for you.
Step 3: Verify and update the details as required. Make sure that you also upload the policy soft copy (or the scanned copy).
4.2.3.Policy Outward
Once we have updated the policy details in the software, we need to send the policy copy to the customer, as the document is still at the broker office. Just before we send the policy copy to the customer, we need to record the outward details — like outward date, mode of dispatch etc in Sibro. This is done in the Outward Awaited stage.
How can i record the policy outward details?
Step 1: Click on Add (+) → Add Business → Outward. Here you can see the policy listed in the Converted page where outward is awaited.
Step 2: Select the respective policy and click on Outward Awaited button. You will then get a form where you can update the outward information like outward date and mode of dispatch details.
Step 3: Once done, click on Save.
How can i record a customer with more than one policy document?
If the same customer has more than one policy document that is outward awaited, it can be done in a single step via Group Outward option.
Step 1: Click on Add (+) → Group Outward → Select Client. The page will list all the policies of the corresponding client that is currently outward awaited. Select the policies we want to send out, and enter the outward details and click Save.
![]()
How can i send the policy document to the customer via email?
You can also optionally send the policy document as an email to the customer right from Sibro during the add policy stage by clicking on the Notify Customer option. Here you can select the required email template from the drop down and do the necessary edits as per required. The email will be sent from the logged in user’s email address.
4.2.4.Outward at Policy Add
When ever we are sending the document to the client either by courier or by regular post, click the Outward Awaited button. A new page will be displayed to enter the policy outward details. Here you will have the option to check or un-check Premium Receipt and Policy Document options.
Here you will also have the option to add any additional documents via Other Documents section with date and mode of dispatch and other details. Review the information once again and click Save to complete the process.
Now the policy has been dispatched.
4.2.5.Policy Delivery
After sending the policies to the customer, you have to confirmed that the customer has received the documents. The policy delivery cycle will only be completed when customer acknowledges that they have received the policy. Once you confirm that the customer has received the policy, you can change the Dispatched status to Delivered.
How can i change the policy status from Dispatched to Delivered?
Step 1: Click on Add (+) → Add Business → Acknowledgement. This page contains all the dispatched policies.
Step 2: Select the policy that we need to update and click on Dispatched. You will be taken to a page where you can mention the acknowledgement date.
Step 3: Click Confirm. The policy status will be updated to Delivered.
Note: You can also complete the cycle instantly for those polices which doesn’t needed to be send via courier or post, you can do that by checking the Send to Client and Delivered check boxes.
How can i change the policy status if a customer has more than one pending acknowledgements?
If a customer has more than one pending acknowledgements, we can update their status in bulk via Group Outward.
Step 1: Click on Add (+) → Add Business → Group Outward → Select Client → Change Status to Dispatched. The list of dispatched policies of that particular customer will be displayed.
Step 2: Select the policies that are acknowledged by the customer and mention the acknowledged date
Step 3: Click Save to complete the process.
5.Custom Fields
5.1.Client Custom Field
5.2.Policy Custom Field
6.Pay In Rules
Sibro helps you to draft Request for Quotes (RFQ), send bulk emails with RFQs to core insurance companies, updates the quotations received from the insurance companies, creates standard quote comparison sheets and share these quote comparisons to customers via email and WhatsApp.
When you click on the Templates menu from the Settings, you can see sub menus such as:
- RFQ Template Master
- Invoice Master
- Email Master
- SMS Master
- Member List
6.1.Guidelines for adding custom fields
6.2.How to add Pay in rules with an example
7.Reports
7.1.Client accounts
7.2.IRDA statement
7.4.Business Statement
7.5.Lost Bussiness Report
7.6.Login User Report
7.7.Member Business Summary Report
7.8.Documents IN-OUT
7.9.Claim Acknowledgement Report
7.10.Month Wise Bussiness Report
7.11.List
7.12.Tickets
7.13.Daily Task Progress
As you start finishing your tasks, the progress bar will move from 0 to 100%. Trust me, it would feel so great and satisfying to see as the percentage increases. In addition to that, you will see a few rows that contain pending renewals, prospects, and more. When you click on any row, it will display the tasks that are pending and due today in your organization.
In short, the software will give you the work summary for each day.
The best thing about this feature is that a person can see others’ progress based upon user privileges. That is, a business owner can see all his employees’ daily task summary if the user privileges are set.
7.14.IRDA Accepted Software
Sibro is compliant with IRDAI regulations. You can also download the Quarterly & Annual IRDAI return filings with the click of a button. When an IRDAI investigation occurs, we may share your data to the respective authority with your concern.
8.Endorsements
Sibro offers an effective sets of reports in the software, that helps you see the status, compare performance, and drive sales.
Client Accounts
A CD like statement prepared by Sibro for each client. You can see what happened on different dates between a client and an insurer. It includes payments, refunds, policies & endorsements, and the CD Account Balance.
Business Statement
A comprehensive statement of all the business done. It can be filtered by Month, Quarter, Year, etc.
Member Business Summary Report
This report gives the month wise comparison of how each member & team is performing.
Month Wise Business Report
A powerful report that gives you month wise summary of various stakeholders; i.e. Insurers, Branches, Business Owners, Clients, Policies & Class of Policies.
Lost Business Report
The list of businesses that we lost, and why we lost them.
Premium Register
A statement of receipts and payments
IRDA Report
This report gives us the Statements required for easy filing of IRDAI Compliance. They include both monthly & quarterly reports.
Log
Sibro will generate a log of the logins, as well as the log of the emails & SMSs sent from Sibro.
Documents IN-OUT
Sibro will generate a log of the inward & outward documents.
8.4.Extension
8.5.Cancellation
9.Installments(Life)
This feature is used for policies that the payments are scheduled on an installment basis.
How Installment works in Sibro?
Step 1: After clicking Policy Awaited, you have to review all the necessary information. Now after scrolling down, you can see a drop down named as Payment Terms.
Step 2: Click the same and you will have the options to set this policy payments as installments such as one time, monthly, quarterly, half yearly and annually. This is done only after receiving the initial payment and after issuing the policy. The system will auto calculate the premium dates.
Step 3: Click Save button after verifying the numbers and dates. Now you can see the policy listed under the Installments section.
9.1.Template upload
9.2.Add Installment
9.3.Record Payment
9.4.Search
In addition to Apply Filter, you will also find a Search option on all the pages where there is a tabular display of data. The search box is placed on the top right of every table. You can search and drill down further on the data that is filtered with the help of this search box.
10.Installments(General)
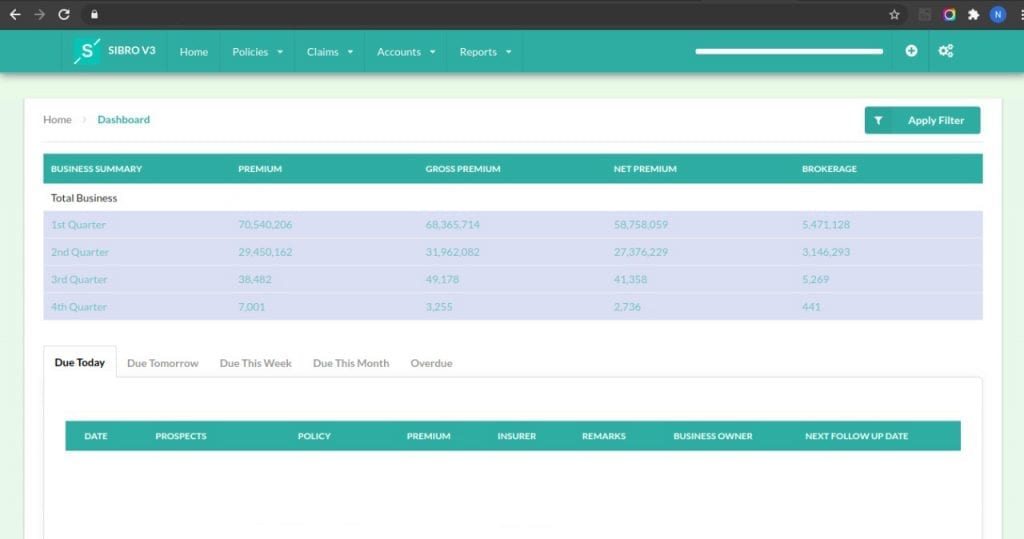
The dashboard is the first thing you’ll see when you log into Sibro. Dashboard will give you an overall picture of the entire business flows happening within the organization.
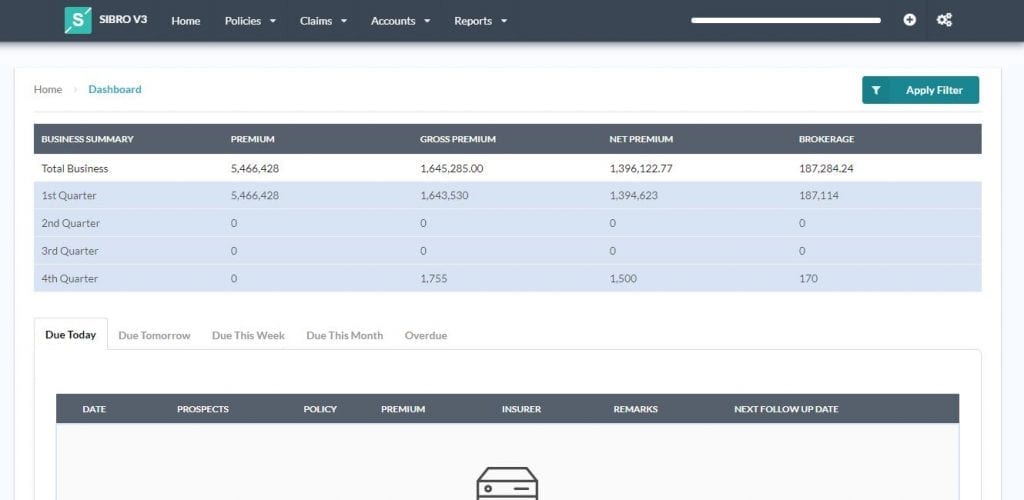
It has the following menus.
- Home
- Policies
- Claims
- Accounts
- Reports
You can also see Add (+) and Settings options at the top corner of the menu. In the dashboard, you can see the following.
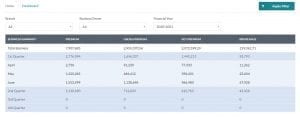
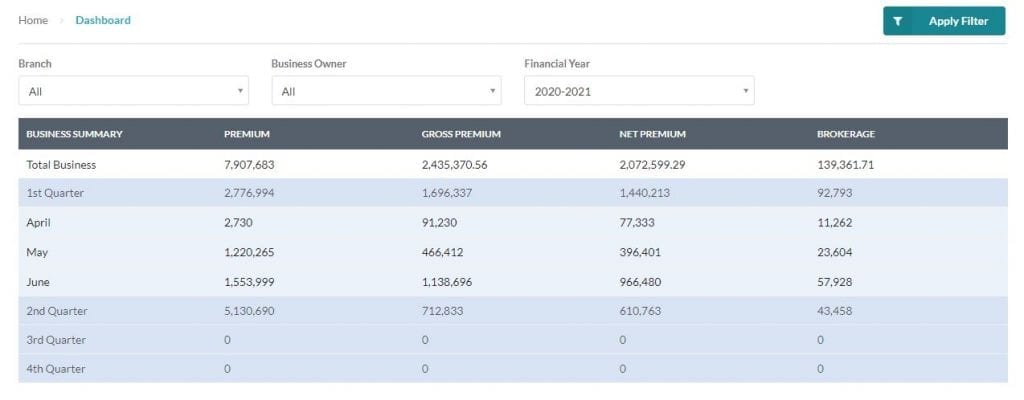
Business Summary
Business summary gives you a brief understanding of your entire business recorded in the software. The default display shows the quarterly business summary. When you click on a item, it will expand and show the month-wise summary in detail. If you have multiple branches as well as privileges, you can click further, and the system will show the branch wise split up also. The numbers will be displaying your premium, gross premium, net premium, and the brokerage with respect to the selected period.
Tasks Summary
All tasks related to the logged in user will be displayed here. You can view them as tasks Due Today, Due Tomorrow, Due This Week, Due This Month, and Overdue. All the pending/new prospects, renewals, follow-ups, and installments by the due date will be displayed here accordingly.
10.1.Add Installment
10.2.Convert to Endorsement
11.Accounts Invoicing and Reconciliation
This is one the most important module in the software. Sibro’s Accounts module helps you to:
- Create invoices in the respective formats prescribed by the insurer
- Track payments – i.e. between Due, Overdue, Partially Paid and Fully Paid
- Create Credit Notes and Debit Notes
- Reconciliation of the Insurer Business Statement and identifying mistakes
- To find out the the businesses that we did not get brokerage for, and help followup.
- Reconciliation of TDS Deducted.
You can create invoices as per the statement received from the respective insurance companies.
How to know the insurers that you need to request for a monthly statement?
Click on Accounts → Unvoiced. A page will be displayed with the list of insurance companies that you need to request for monthly statements. You could see the corresponding month, name of the insurer, branch, type, and brokerage due. You will also have the provision to drill down the data using the Apply Filter option. This report will give you an indication of the invoices that you need to generate for the respective parties.
How can i generate an invoice?
Step 1: Go to the main menu. Click Accounts → Invoice. Click on the Add Invoice button corresponding to the insurer details.
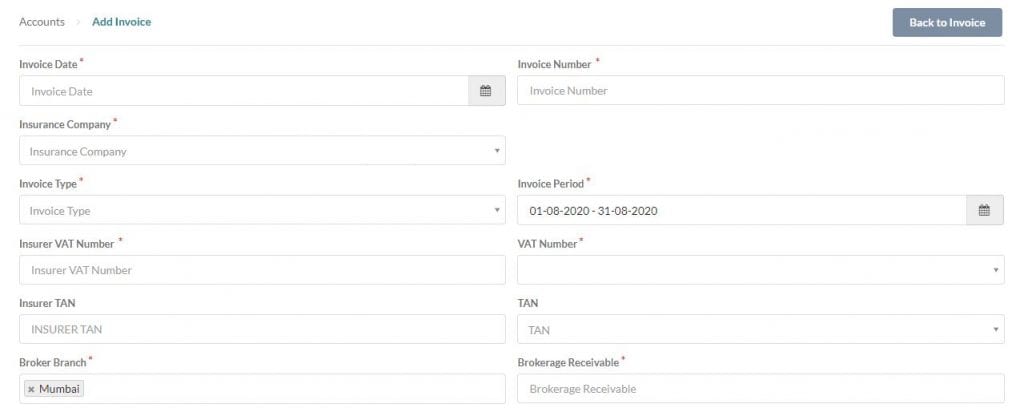
Step 2: On click Add Invoice a page will be displayed with all the necessary fields for creating an invoice. Enter the details such as invoice date, invoice number, the insurance company, etc.
Step 3: Click Save to generate an invoice.
When the payment is received, click on the Due button and enter the payment details.
11.1.Uninvoiced
11.2.Add Invoice
11.3.Reconciliation
Click on Non Reconciled button and a page will be displayed. Here you will have the option to download a sample excel sheet by clicking on the Download Sample Excel button. Open the excel after downloading and you can see two sections and as Policy Endorsement Number and Brokerage Receivable. Enter the data received from the insurer and save the excel file. Now click on the Upload Excel File button and upload the corresponding excel file and click Next. You will get a toast that says “Auto-reconciliation is Successful”.
If there are any irregularities, the system will display the details as an alert message. If there is any mismatch in the amount raised, you can issue a debit note so that the amount can be settled later.
11.4.AutoReconciliation
11.5.Manual Reconciliation
11.6.Credit Note/Debit Note
11.7.Invoice Template
11.8.Member List
Sibro’s member lists feature helps you to upload member lists to the system. These templates are customizable and you can create as many member list templates as you want.
How to create customized member list templates?
Step 1: Settings → Templates → Member List → Add Variables. Variables are the predefined validations that needed to be kept for each field values.
Eg: Age should be of type number, date of birth should be of type date, etc. Variables can be managed via Settings icon → Templates → Member List → Variables.
Step 2: A pop up will be displayed to enter Variable Name and Field Type. Enter necessary data and click Add to save the new memberlist variable. Once variables are created, start creating the necessary templates.
Step 3: Now click on Back to Member List button → Add Template. A pop up will be displayed to enter Template Name, Position and Variables Type
Step 4: After entering the corresponding details, click Add Template to create a new template.
Step 5: After defining the template, link the template to the corresponding policy via policy master.
Step 6: Now while updating the policies in the Policy Master page, click on any of the desired policy and you can see the Upload Member List checkbox.
Step 7: Click on it and select the required template and save. Then, during policy entry, you will get to upload member list in the defined format.
11.9.Invoice Master
11.10.TDS Reconciliation
To generate an invoice, go to the main menu. Click Accounts → TDS Reconciliation and the corresponding data will be displayed. Click on the Not Filed button and a pop up will be displayed. You can enter the corresponding data and click Add Filing to complete TDS Reconciliation filing.
12.Payout Calculation
12.1.Pay out Master
13.Payout Posting and Reconciliation
14.Emailing
14.1.Email Templates
This feature helps you to communicate to your clients via email within the system itself. Here, you can add all the different email templates required for various emailing categories; if a category has more than one email, then during that process, you will get to choose which email template to load.
Note that under each category, we can add any variables you want by inserting them in {{variable-name}
How to set up an email template?
Step 1: Click on Settings → Templates → Email Master→ Add Email Template.
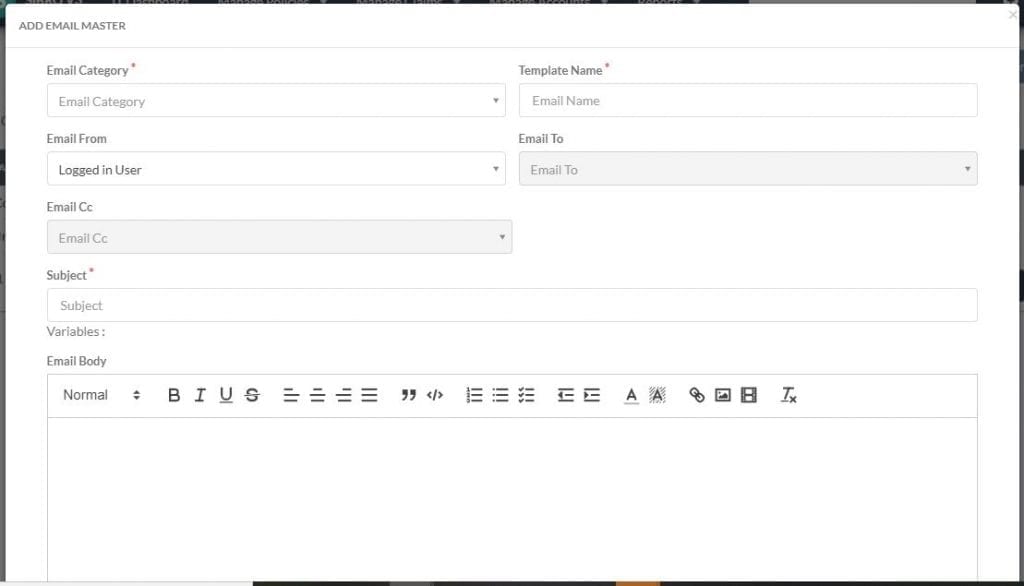
Step 2: Now select the email category from the drop down, set template name, sending and receiving points, add CC if any. Now set the required email subject and email body with the help of the variables
Step 3:Click Save to define a new email template.
14.2.Send Emails
15.Claims Management
The claims module helps you to track the status of every claim that arrives systematically. It also tracks the TAT of every claim. You can attach and keep all the documents that your client shares. If there is any shortfall, you will have the provision to inform them directly from the software.
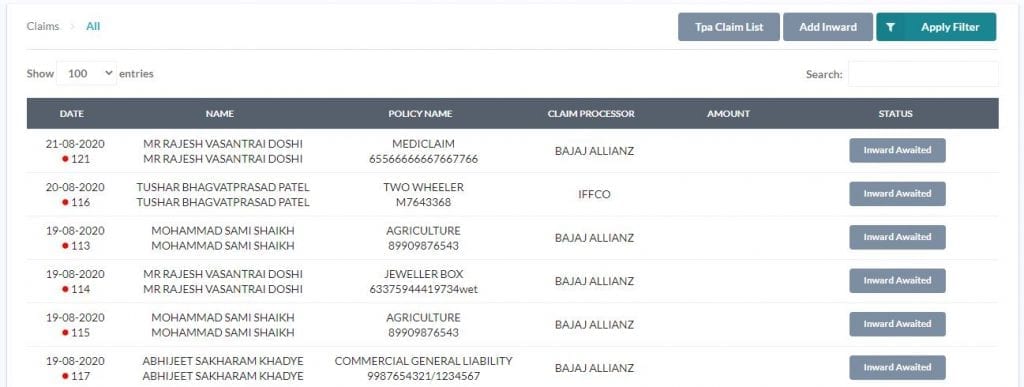
In the dashboard, when you click on Claims main menu, you will find sub sections such as All, Health, Motor and so on.
Click on any of them and Sibro will list out all the pending claims and their current statuses. When you click on any row, it will expand further and show at what stage the claim is. You can click on every stage and make changes to it right away.
15.1.Claim Master Set Up
Here you can set up all the claims related attributes that is being dealt with. When you click on the Claims menu from the Settings, you can see sub menus such as:
- Documents
- TPA Master
- Claim Custom
15.1.1.Documents
For every claim to processed, it demands a certain set of documents that is needed to be collected from the customer. These documents list varies from policy to policy. That’s why Sibro offers its Documents feature where you can create your own customized checklist for every policy that is associated with the organization.
How i can create a pre-defined document collection checklist for processing claims?
Step 1: Click on Settings → Claims → Documents. Here you can see all policies associated with the organization listed here.
Step 2: By click and expand feature, you can create a document checklist for that particular policy.
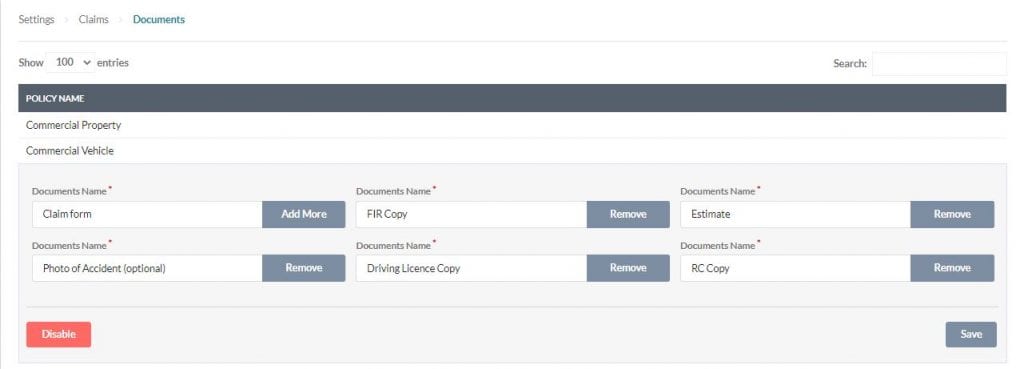
Step 3: Click Add More button for adding new fields. Click Remove for deleting unwanted fields.
Step 4: After adding all the required fields for the checklist, click Save button for save changes.
Now when a claim arrives for that particular policy, these added items will be shown as checklist during the time of claim document collection.
15.1.2.TPA Master
Third party Administrators are mainly related to heath claims. They are the ones who usually deals with the heath claims. Some companies have in-house TPAs and others normally outsource them when required. Sibro helps you to manage all your TPAs associated with your organization. You can see all of them listed with their corresponding name, phone number, email address, physical address and their statuses.
How to add a new TPA?
Step 1: Click on Settings → Claims → TPA Master → Add TPA.
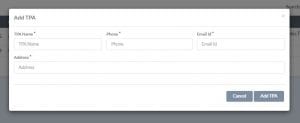
Step 2: A pop up will be displayed where you can enter your TPA Name, Phone, Email Id and Address.
Step 4: Click Add TPA button to the new TPA.
Now whenever we send an SMS, query, email etc, these details will be auto populated by the system as the TPA.
When a new claim arrives and if the added TPA is the claim processor, then the system will auto populate the TPA details and instead of emailing the insurance company’s contact person, the system will email the TPA associated with that claim. Also the address of the TPA will be used for couriering the hard copies.
15.1.3.Claim Custom
This is where you can customize the claims form. If you want to capture additional information about the client other than the system captures when a claim comes, you can simply do that by creating an additional text box or drop down via client custom fields.
How to add a new claim custom field?
To add claim custom fields, follow the below steps.
Step 1: Click on Settings → Claims → Claim Custom → Custom Fields → Add Custom Field.
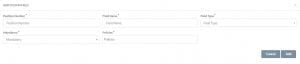
Step 2: A pop up will be displayed where you have to enter the position number, field name, field type, policies and also need to set whether this field needs to be mandatory or not.
Step 3: Click Add button after entering all the above details and a new custom field will be created.
When you do a claim intimation for a particular client who has a policy that has pre-assigned claim custom fields, these newly created fields will be populated in that claim intimation form.
15.2.Claim Intimation
Firstly, we have to inform the claim processors that the accidental event has occurred. This intimation process is known as Claim Intimation. Meanwhile you can record the intimation in Sibro to keep track of it. In some cases, this intimation step is optional because your client would have directly informed the claim processors.
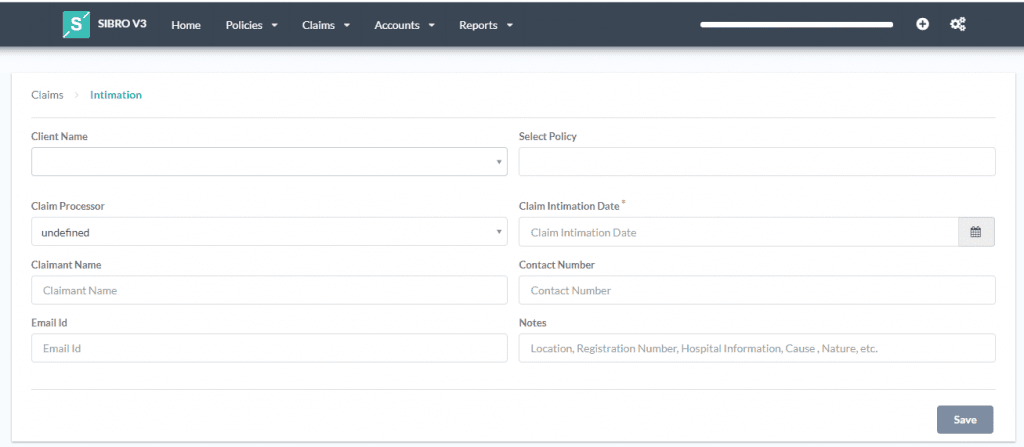
How can i record a claim intimation in Sibro?
Step 1: Click on Add (+) → Add Claim → Intimation. Select your client name and policy name from the drop down and the remaining details such as claim processor, claimant name etc will be auto populated by the system.
Step 2: Select the claim intimation date, enter the remaining details (if any)
Step 3: Click Save to complete the process.
That’s it. You’ve added a claim and now the software will record this as Inward Awaited stage; meaning that you are waiting for the supporting documents to arrive.
15.3.Claim Inward
Once the documents are arrived at your desk, you can save those details as shown below.
Step 1: Click on Add (+) → Add Claim → Inward. A page will be displayed with the corresponding details.
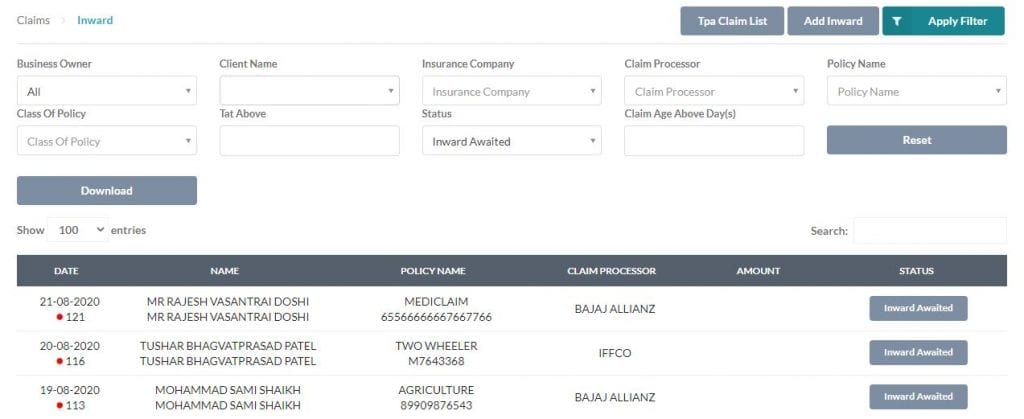
Step 2: Click and expand for view the timeline.
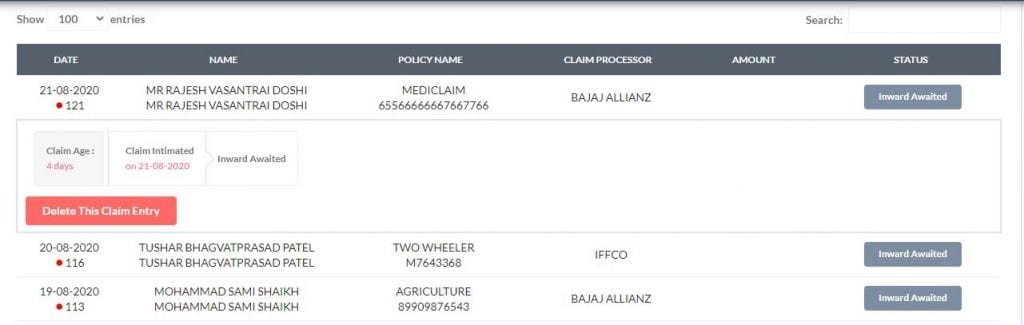
Step 3: Click on the Inward Awaited button when you receive those supporting documents. A page will be displayed with all the information with respected to the claim. Here you will have the provision to scan and upload those documents into the system. As every insurance differs in their data collection forms, it is advisable to cross verify all the information displayed, enter the required information
Step 4: Click Save.to complete the Claim Inward process.
15.4.Document Checklist
The claims document checklist ensures you of any claim related documents shortfall. You can tick the boxes with the documents you have received. You can also edit this document checklist as per your need.
How to edit document checklist?
While document collection, it is possible to pre-define the checklist of documents required.
Step 1: Click the Settings → Claims → Documents. In this page, you can set the list of documents required.
Step 2: As you start filling out the required details, the software will auto fill other relevant data. Drag down and you will find a checklist.
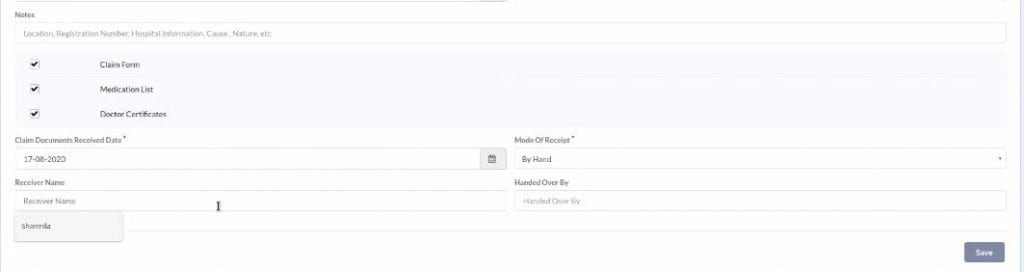
Step 3: You have to come back to the Inward stage. Once done with the checklist, you can fill the claim documents received date and mode of receipt (by hand or courier or post or mail). It’s optional to add the surveyor and receiver’s name but doing this could help in future actions.
Step 3: Click Save. Now the ‘Inward Awaited’ stage will be changed to ‘Documents Received’ stage.
The next step is to send the documents to claim processor, i.e., the Outward stage.
15.5.Claim Outward
Once you have sent the documents to claim processor, you have to record it down in the system.
How can i record a document outward in Sibro?
Step 1: Click on Add (+) → Add Claim → Outward. Fill out the Outward date and you will find so many pre-filled details.
Step 2: Review those data and then click Save.
Now, the current stage changes from Sent to Claim Processor to Claim Processing Awaited. The response from claim processors can be any of these – Settled, Repudiated, Queried, Claim Followup Note, Approved.
Settled
This status indicates that the claim processor has settled the case and released the claim amount.
Repudiated
The claim processor may reject the claim due to various reasons. You can save the status as ‘Repudiated’ with the date and reason for rejection.
Queried
Due to shortfall of some documents or other reasons, the claim processor may send a query which is displayed as ‘Query’ stage. Click on that ‘Queried’ and you can save the queried date and details. You can remind the clients by sending mail directly from the query stage. When the client sends the documents, the ‘Queried’ stage will be moved to ‘Queried Response Sent’ stage. Next, they might approve the claim or send a query again.
If the client doesn’t send the documents, the claim processor would close the claim. This stage is known as ‘Closed.’ You can mark the claim as closed. When the client responds to the query, you can reopen the claim and send the documents to the claim processor.
Now, the stage will be mentioned as ‘Query Response Awaited.’ The claim processor might approve or reject the claim eventually.
Claim Followup Note
If you click Claim Followup Note, you can enter the corresponding followup note against the claim request and click Save.
Approved
This status indicates that the claim processor has approved the claim and will settle the payment immediately. So, you can mention it as Approved.
Sometimes, it might take a few days to settle. In such cases, mark it as Approved. For instance, when a customer inquiries that he didn’t receive the payment yet, we can confirm that they have approved the claim and ask him to wait.
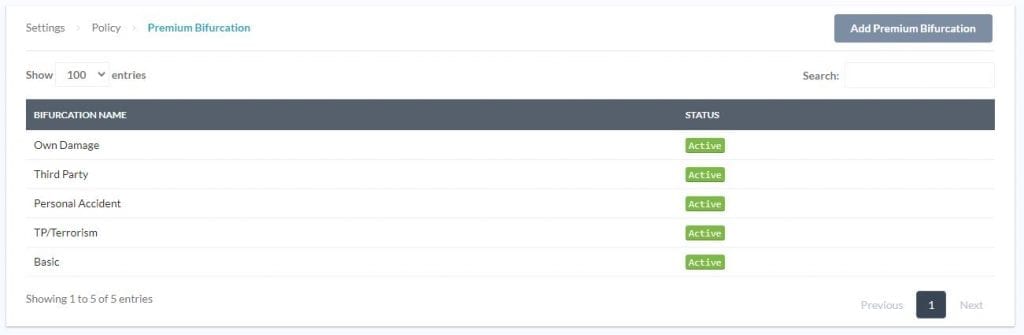
15.6.Premium Bifurcation
Some policies may have different inner components/sub divisions often referred as bifurcations. This is an optional master. This is applicable when you have different types of components within the policy.
Eg: Motor Policy having Own Damage & Third Party with separate tax and commission percentages.
How to add premium bifurcation?
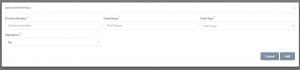
Step 1: Click on Settings → Policy → Premium Bifurcation → Add Premium Bifurcation. A pop u will be displayed to enter the new bifurcation.
Step 2: Enter the position number and bifurcation name.
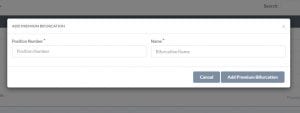
Step 3: Click Add Premium Bifurcation button to save the new bifurcation. These bifurcations will be reflected for the respective policies in the the Policy Master.
15.7.TPA Management
As Sibro is connected to TPAs (Third Party Administrator), the system will sync the TPAs claim list with your claims list. If the claim matches with the TPA list, it will turn green; otherwise it will be red. You can see the colors in every claim row. Thus, Sibro makes the claim process much easier.
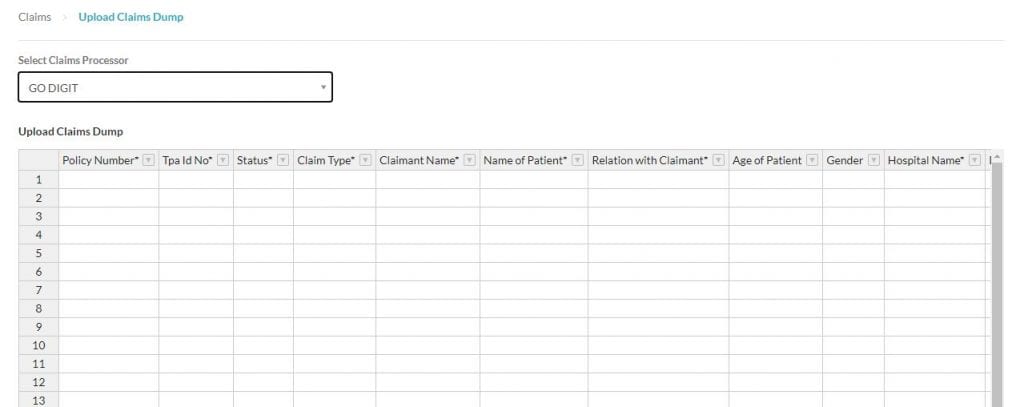
15.8.Claims Dump
If the TPA has given you login credentials of their system, you can download the claim details and upload it in your software. You can upload the TPA’s client details as follows.
Step 1: Click on Add (+) → Add Claim → Claims Dump → Upload Claims Dump
Step 2: Select the claims processor and you will find a spreadsheet template. You can start uploading. Import.
16.RFQ and Quote Comparison
You will see an Add New RFQ button on the bottom of the screen along with the other buttons. Now let’s checkout how you can send a RFQ to the insurers.
How to send RFQ to the insurers?
Step 1: Click on Policies → Upcoming. All upcoming policies will be listed here.
Step 2: Click on the respective policy that you want to process.By click and expand functionality, you can see the details of the policy along with an Add New RFQ button.
Step 3: Click on the Add New RFQ button, system will automatically drafts an RFQ for the prospect with the available details. You can edit or remove the details if needed. If you want to set an entire new RFQ, click RFQ Template Master here.
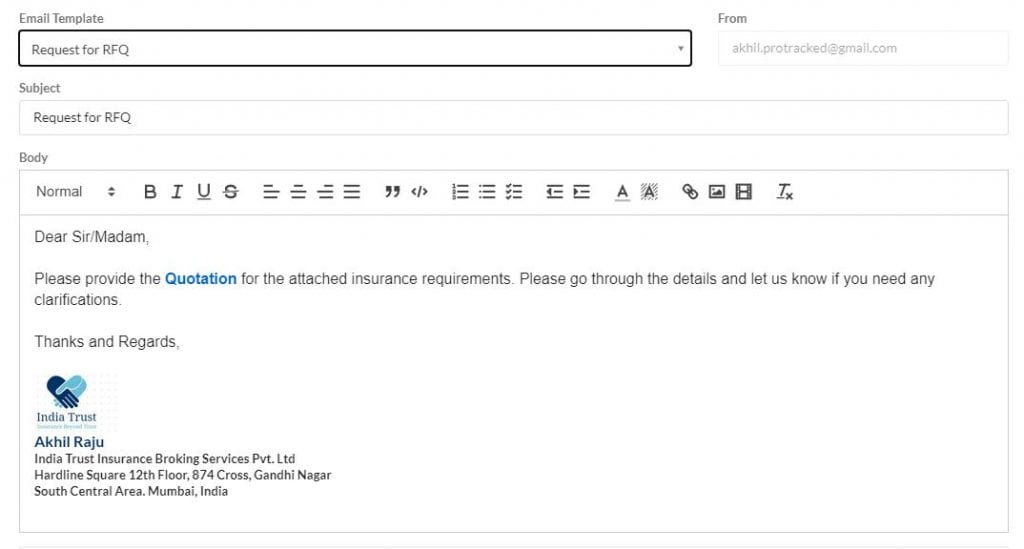
Step 4: Once you are done with the data, you can click on the Preview button to get a preview of the created RFQ. A PDF will be generated with all the necessary details.
Step 5: Click Save and Send Email button so that the system will automatically draft an email with all the necessary information. You can cross verity the email contents, select the core companies receiving points, attach additional documents if needed and click Save and Send Email. Now the system will send separate email for all the receiving points automatically.
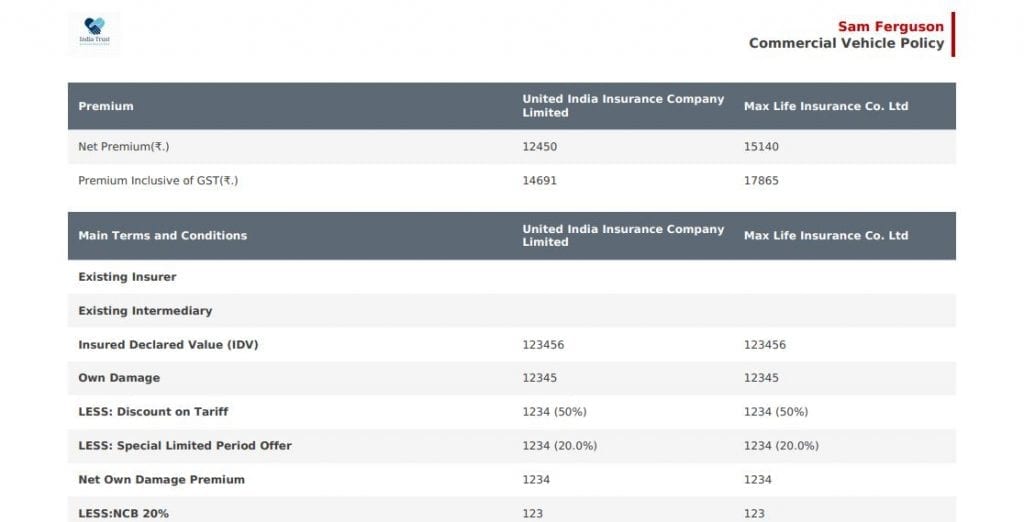
How to create and send a Quote Comparison Sheet to your customer?
After sending the RFQ to the insurers, now the system will display that it is waiting for the response from the respective companies. When you get a response from the insurance companies, you can update their quotation into the system by clicking the Quote Awaited button. A pop up will be displayed for doing the necessary edits. After doing every updations, click Save Quotation button. Do the same process for other respondents also.
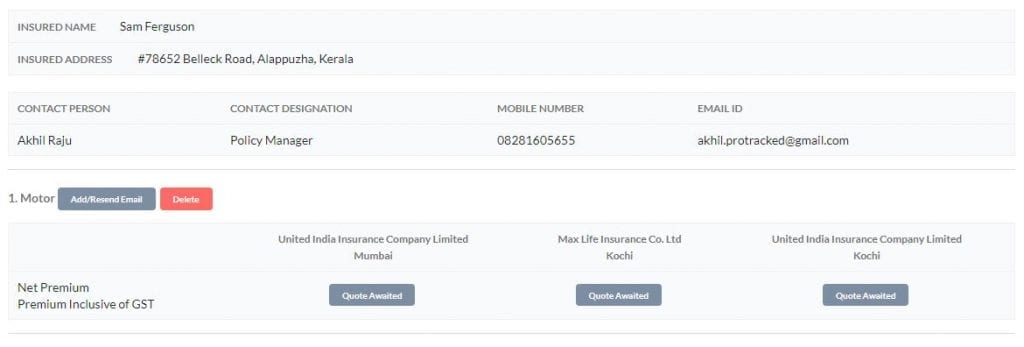
Once updated you can preview the Quote Comparison Sheet by clicking on the View Detail Quote Comparison button. A professional looking standard quote comparison sheet will be generated with all the necessary information.
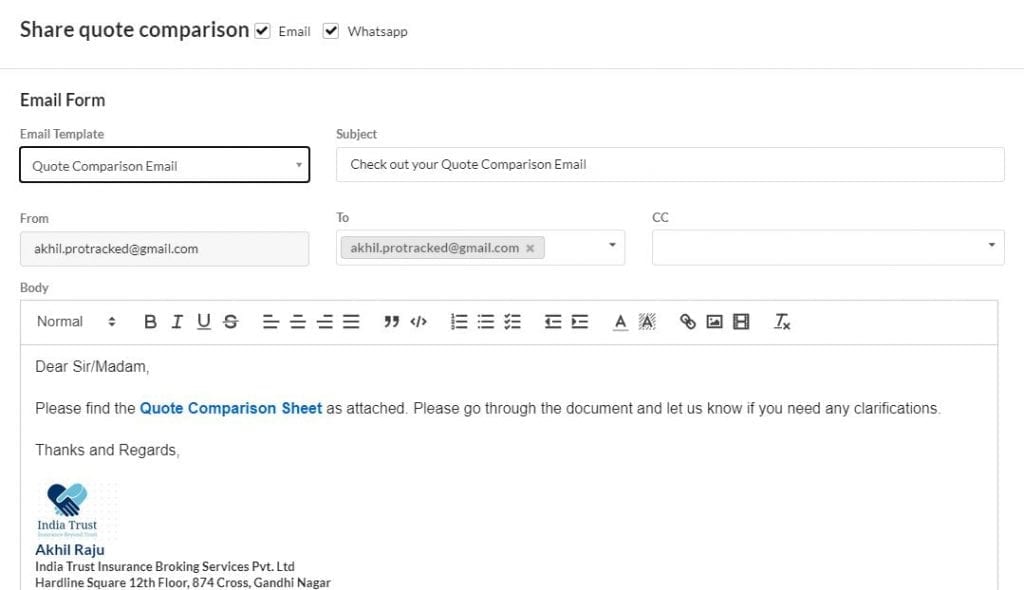
By clicking on the Notify Customer button, you can email and whatsapp this quote comparison sheet to your customer.
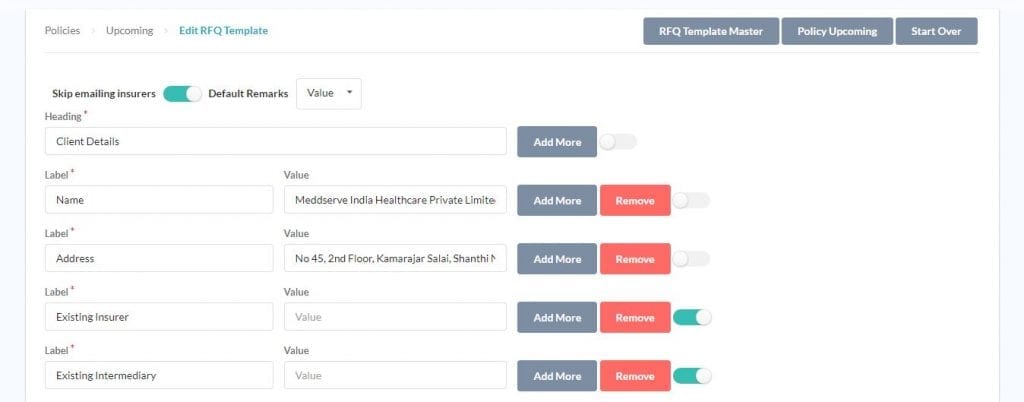
16.1.RFQ Template Master
Here you can define your own RFQ Templates. We have added two default templates; for Group Mediclaim and Motor. Please take a look at how these two templates are set up. That will also give you an idea of how to create your own RFQ templates.
How to create a RFQ template?
Step 1: Click on Settings → Templates → RFQ Template Master → Add RFQ .
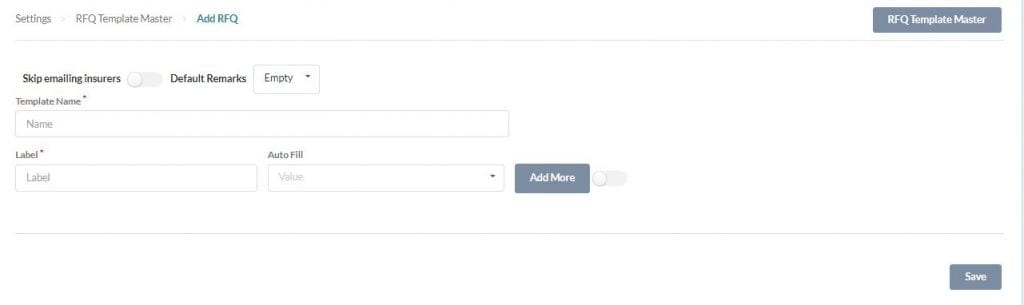
Step 2: Select the Default Remarks type from the drop down.
Step 3: Enter the new template name and start adding the required fields. You can add required fields by clicking the Add More button. Here you can also opt for skip emailing insurers by swiping the toggle button.
Step 3: Click Save to complete the process.
How to edit an existing RFQ template?
Step 1: Click on Settings → Templates → RFQ Template Master. Here you can see the existing RFQs listed here.
Step 2: Click on the More drop down corresponds to the required template master. There you can see the option to Edit and Delete the template.
Step 3: Click on the Edit and you can see the corresponding details here. Cross check the data, add or remove any fields.
Step 4: Click Save button to save the changes.
16.2.Connect Template with Policy
16.3.Add new RFQ
16.4.Quote Comparison
17.Declarations
17.1.Declaration Template
17.2.Connect Template with Policy
17.3.Add Declaration Schedule
17.4.Record Declarations
18.Miscellaneous Topics
18.1.Bulk Import
18.1.1.Prospects
18.1.2.Policies
18.2.Delete Policy
18.3.Merge Clients
18.4.Welcome Letter
18.5.Renewal Letter
18.6.Renewal Intimation-Automation
19.Sibro Customization Options
Sometimes, your insurance business model requires a professional call center team to login to your insurance broker ERP software, and trigger phone calls via Click to call; and perform sales and support.
19.1.Call Centre Integration
Call center integration is supported in SIBRO as an additional customization. Checkout the exact process of call center integration into SIBRO.
Step 1: Identify the areas or processes where we need to implement click to call. Usually, they are at prospect follow up, policy outward and delivery, and claim follow up.
Step 2: The broker needs to get a Call Centre Solution (Eg: 3cx, Twilio, etc). The PBX system may either be hosted on cloud or on premise. Both hosting methods are okay; as long as the SIBRO support team gets access to connect & test the integration.
Step 3: Once the Call Centre Solution is in place, share the API documentation, testing credentials and support team contact details of the PBX system with SIBRO support.
Step 4: SIBRO team will review and get back with the cost and timelines; usually they cost Rs 42,000 or $650, and takes 2 weeks (ball park).
Step 5: Once integration is complete, the admin will have to update SIBRO Employee Master to add PBX credentials of each user.
Step 6: Admin will also be able to see the integration & last used details at Settings → Organisation → Integrations (Kept Read Only for stability).
Once the employee credentials are correctly set, users can start using the click to call feature. Note that users may have to be logged in to their PBX system too for a successful call to trigger.
The call recordings of calls triggered via SIBRO are automatically saved as a follow up note in Sibro. So, later, users can listen to the call recordings right from SIBRO.
Note that SIBRO does not keep a copy of the call recordings; rather, SIBRO just plays the call recording file provided by the PBX system. So, if call recordings are removed from the PBX system, then those recordings will no longer play from SIBRO too.
19.2.Insurer API Integration
Insurer API Integration is available in SIBRO as a custom feature. Checkout the steps involved in SIBRO Insurer API Integration process.
What all are the steps involved in Insurer API Integration?
Step 1: After the discussions and confirmation from the insurer side, arrange for the integration kits.You may have to do an agreement with the insurer to avail the kits. Also sometimes we may have to to white list our IP addresses.
Step 2: After receiving the pre-requisites, share them with our Sibro Support with the insurer’s technical contact person details. The API Kit usually contains (1) Documentation, (2) Sample code and (3) Dummy card. The insurers will usually provide four types of APIs:
- Quotation or Quick Quote APIs – for getting quotes with minimum information.
- Proposal APIs – where we fill in more details of the requirements and generate a proposal in the insurer system.
- Payment APIs – where customers will be redirected to make payment to insurance companies (or broker; as regulation allows)
- Download APIs – where the policy document can be received from the insurer system; to be displayed or downloaded.
At this stage, we only will have access to Insurer’s UAT server. Note that we also have a Quote Calculator of pre-underwritten products as APIs. Those APIs only support till the Quotation Stage.
Step 3: SIBRO team will first create the inputs required for Quotation and Proposal via Sibro Policy Master → Custom Fields. For some cases like motor, we may enable a few new custom field types from the back-end; like vehicle list, and RTO details.
Step 4: SIBRO team will then start the integration of the APIs. We do it via a middleware called API Engine. This is to simplify the system. The API engine standardizes the APIs for SIBRO. It also provides some data like vehicle names, RTO, etc to SIBRO.
Step 5: Once Integration is complete, at Organisation → Integrations → Insurer API Integration, the integrated APIs will get listed. When clicked on it. It will expand and show 3 tabs such as (1) General, (2) Quotation and (3) Proposal.
In (1) General, you can see the API credentials. This is kept read only for stability. You can however set the SIBRO Insurer and Policy Name of the API Integration.
In (2) Quotation, against each API input, select the corresponding SIBRO inputs; i.e. standard fields or custom fields.
In (3) Proposal too, select the corresponding SIBRO inputs.
Once done, SIBRO knows what information to pass to each API without much manual intervention.
Step 6: Once tested, submit our build for UAT. The insurer will review and do User Acceptance Testing. If bugs are reported, we shall correct them. If all test cases are cleared, we will get Sign Off.
Step 7: After Sign Off, if all legal formalities are completed, the insurer will share the production credentials. SIBRO support team will update the same from the back.
19.3.Click & Expand
Throughout the software, in order to increase user experience, click and expand functionality has been implemented. So by default, you will see the overall details. When you click on a specific row, it will open up and show you the further details; be it policy, claim, invoice or any report, click on the row, and it will expand and show you further relevant details.
19.4.Record Payment
19.5.Apply Filter
On almost every page where data is displayed as a table, you will see an Apply Filter button on the top right corner. Clicking the same will show you various options to filter and drill down the data that is being displayed. These advanced filter options will ease your search process. Here you have the provision to search via Branch, Business Owner, and Financial Year.
On the policy page you will see filters related to policy and its status. On the Claims page, you will see filters relevant to claims and their status.
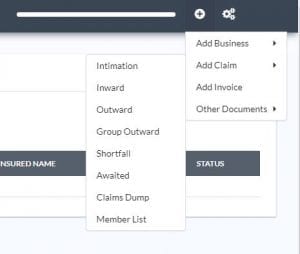
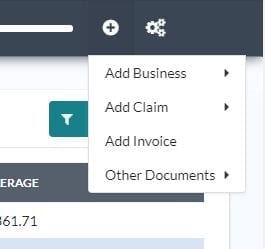
20.Add New
To add new records to the software, drag your mouse pointer to the top right ‘+’ button. On click, you will see sub-menus such as:-
- Add Business
- Add Claims
- Add Invoice
- Other Documents.
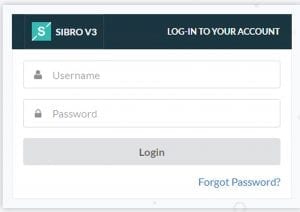
21.Sibro Login
You can login to your Sibro account using your username and password. Forgot Password option is also available.
How Forgot Password works?
Step 1: Click on the Forgot Password link from the login page. You will be navigated to a password reset page.
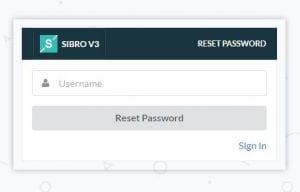
Step 2: Enter your username. Click Reset Password button.
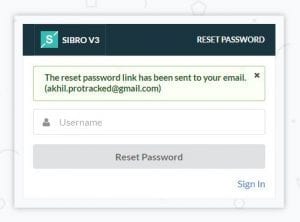
Step 3: Now you will receive an email to your registered email address with a password reset link.
Step 4: Log in to your email and click on the link. You will be navigated to a Rest Password page.
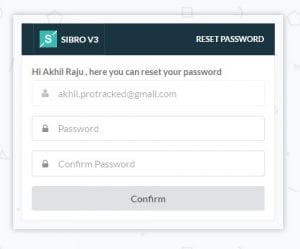
Step 5: Now enter the respective credentials and click Confirm. Your new password has been successfully updated.
How can admin reset an employee password?
Step 1: Click on Settings → Employee → Employee Master. Here yo can see all the employees listed here.
Step 2: Click on the corresponding employee and all the employee details will be displayed.
Step 3: Here you can see the Password field. Re-enter the new password here.
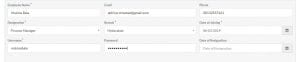
Step 4: Click Update Employee button to save new password. Now the employee can use this new password to login to Sibro.
How can admin handle resigned employees in Sibro?
Step 1: Click on Settings → Employee → Employee Master. Here yo can see all the employees listed here.
Step 2: Click on the corresponding employee and all the employee details will be displayed.
Step 3: Here you can see the Date of Resignation field. Select the date you want to set as resignation date.
Step 4: Click Update Employee button. Now from that date onwards, the employee cannot be able to login to the software. Also Rest Password option won’t be available for that user since then.
22.Client Attachments
A single client can have more than one prospects as well as policies. Client Attachments are attachments of each client; usually KYC (Know Your Customer) documents. These uploaded documents will be readily available for the next time we select the same client somewhere.
These documents are related to the clients, not policy. So please make sure you do not add any policy related documents under the client attachments section.
This is exclusively those documents that are related to the client details, not policy details. So, do not add any policy documents or proposal documents under the client attachments section.
You can view and update the client attachments during add and edit of a client; either from the Masters or via the Prospect or Policy request add/edit.
23.Conclusion
We believes that these information had given you enough knowledge to have a clear understanding about Sibro features and its workflow. If you want any more additional information, click here.
Thanks,
Sibro Documentation Team
Lasted Updated on: 25-08-2020 05:00 PM IST