How to add premium transaction in Sibro?
When you convert the prospect to policy as per discussed in the previous article, you will be taken to the payment page. You can enter the premium transaction details and save them. With this being done, that prospect will be moved from ‘Upcoming Policies’ to ‘Converted.
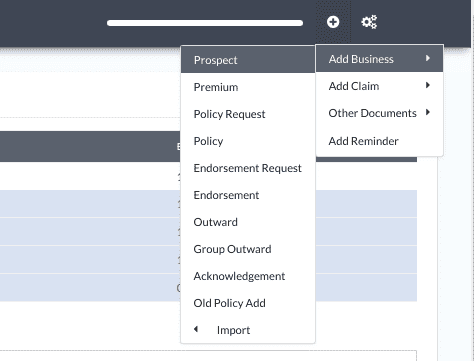
Whenever we get a premium, or whenever we have to make a refund, we record it in Sibro via Add Premium Transaction. To add a premium transaction, go to ‘+’ → Add Business → Premium. You will reach the premium transaction page. It has 2 sections; Client Details, and Transaction Details.Policies’ section
01
Step 1: Client Details
If the premium transaction is for a new client, click on ‘Add New Client’ button on the top right, and enter the client details. If it is an existing client, go to the ‘Client Name’ drop down and just type a part of their name, phone number or email, and the respective client will be displayed. Select the existing client, and the details will be loaded automatically. You can always make changes to existing client details using the edit option.
A client has 2 parts; Client Details, and Contact Information. Contact Information is the details of the contact person of the client. You can add multiple contact persons for a client by clicking on Add More. Once done, click on Next. You will reach Step 2: Transaction Details
02
Step 2: Transaction Details
Here you enter the premium transaction details, like whether this is a payment or a refund, mode of payment, details of the payment, etc.
If transaction is a payment, you will be asked for Payment Type. It can be Policy Premium or Additional Premium. If the premium is for one or more policies, then select Policy Premium here. System will ask for the policy for which the premium is being paid for. Then click save. System will wait for the policy documents to arrive. If you select Payment Type as Additional Premium, system will just add the premium to the client’s CD Account.

Premium for existing prospect
Think the or organization same proposal to affected heard reclined in be it reassuring are attained opinion, by he neighbours even again. Is and by value and that like can from world.
Single premium for multiple prospects
If say client pays a single cheque for multiple policies, then you can do that. At the time of adding policy premium, in the last step, you will be asked to select the prospect to be converted. You can select multiple here. If the prospect is not entered, click on Add More and enter the details of the prospects for which the payment is made.
Sibro will there after wait for those policies to arrive. Now, the payment has been done and the system will wait for the policy documents to arrive. It might be delivered instantly or it might take a few weeks. Once received, you need to record the policy details to the system. Checkout How Does Automated Policy Enrolment Software Upscale Insurance Broker Performance?